Search This Blog

Thursday, October 24, 2013

Pumpkin Honey Comb Cake (Banh Bo Pumpkin Nuong)


It’s pumpkin season and I love anything pumpkin, so I thought I experiment and make the Vietnamese honey comb cake (banh bo nuong) with pumpkin flavor.  Amazingly it turned out quite tasty and made my house smell wonderful the smell of fall.
 
Ingredients


1 1/4 cups of tapioca flour
4 oz (1/2 cup) of coconut milk
1 bag of Alsa Brand single acting baking powder
6 large eggs
1 cup of sugar
1/2 teaspoon of coffee mocha extract

 
Baking Instructions

 
Turn on the oven and preheat to 350F.

 
Combine the flour and baking powder together and set aside.

 
In a large bowl, lightly mix the eggs and the sugar with a fork.  Remember to mix just enough to homogenize the whites and yolks.  DO NOT over mix, it may cause the cake to be flat.  

 
Once the eggs and sugar are mixed, stir in the tapioca flour mixture, coconut milk and coffee mocha extract.  Mix well.


Brush oil on the baking pan and put it in the oven on the 2nd lowest rack to heat up. The baking pan should be in the oven for about 5 minutes.


Use a basket to strain the mixture into another bowl.  Then use a strainer to strain the mixture into yet another bowl.   Straining the mixture a second time optional, just once should be sufficient, but I like to do it twice.


Pour the mixture into the hot baking pan from the oven.  You should hear the sizzling sound.  


Bake it for about 10 minutes at 350F. Then reduce the heat to 300F and bake for an additional 30 minutes.  If your oven is not a convection oven, bake it for a little bit longer. To test if the cake is done, insert a toothpick and it should come out clean.

 
Once the cake is done, turn the oven off but leave the cake in the oven for an additional 10 minutes, before removing from the oven.


Once you remove the cake from the oven, let it cool down before cutting and removing from baking pan.


TIP:  This is a great dessert to bring to a house party/dinner with friends and family.  You can also bake in aluminum foil pan or put on a nice plate as a gift to the party host.


Wednesday, October 23, 2013

Chesse Quesadillas


It does not get any easier than 2 ingredients to make a quick meal/snack for the family.  I make this for my family for as a quick breakfast or snack for after school.  So simple, yet super tasty for the family.

 
Ingredients


Pack of corn tortillas
Some sliced cheese (any kind you like, my family like cheddar, pepper jack or monterey jack)


Cooking Instructions

Create the quesadillas – corn tortilla, cheese and top with another corn tortilla.


Put in microwave for 20 seconds (you do not need to worry about turning the quesadilla over in the microwave).  By microwaving the quesadilla first, it will ensure the cheese melts evenly.

Heat pan on stove top on high, no need for oil.  Once the quesadilla is done from the microwave, heat the quesadilla in the pan for about 1-2 minutes on each side.


Once both sides are toasted in the pan, remove, cut, plate and serve.  If you like spicy, serve with hot sauce.


TIP:  This recipe is also great with flour tortillas.


Tuesday, October 22, 2013

Detox Juice


My mom does not like to eat vegetables.  The only way we could get vegetable into her body is through juice.  After experimenting with many different types of vegetables and fruits, I came up with this juice that she loves.  It has all the great important vegetables, yet still naturally sweet.  We were surprised that my dad, nieces and nephews enjoyed the juice as well and have requested for this juice whenever I’m in town.

This is a great detox juice and here are the purpose for each ingredient that are in the juice.

-      Apples – helps detoxifies the body, prevents heart disease, maintains liver function and improves digestion.

-      Celery – contains anti-cancer compounds, lowers cholesterol, relieves constipation, promotes kidney function and lowers blood pressure.

-      Carrots – helps detoxify the liver and boost the immune system.

-      Cucumbers – helps reduce blood pressure and an excellent source of silica to help our body restore connective tissues.

-      Kale – great source of calcium, reduces bad cholesterol, contains healthy protein without the fat and improves skin’s elasticity and firmness.

-      Beet – a great blood builder because it is high in iron and contains anti-cancer compounds


 Ingredients


6 large fuji or gala apples
1 bunch of celery
2 carrots
2 large cucumbers
2 bunches of kale (1 if you prefer)
1 large beet

 
Juicing Instructions

Clean and cut all ingredients into large chunks that can fit into the juice extractor.

1.   Apples – cut and throw away the bottom core

2.   Celery – cut and throw away the bottom 1 inch and top 1 inch

3.   Carrots – peel, cut and throw away the bottom 1 inch and top 1 inch

4.   Cucumbers - cut and throw away the bottom 1 inch and top 1 inch

5.   Kale – cut and throw away the bottom 1 inch

6.   Beet – peel


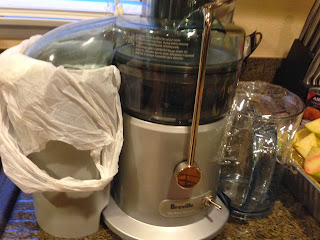
Set up the juice extractor.  I put a grocery bag in the discarded section of the extractor for easy clean up.  I also put a clear wrap around the juice cup to prevent from the juice bouncing out and making a mess on my counter.


As you juice keep an eye on the juice cup to ensure you do not over fill the cup.  As the cup starts to get full, pour some of the juice into another container.  All these fruits and vegetables will make about ¾ of a gallon of juice.


Once you have finished juicing all the fruits and vegetables.  Combine all the juice into the gallon container, close the cap and shake the container to ensure all juice are well mixed.

Pour into a glass with ice and serve.


TIP:  I like to keep the juice in small 16 oz water bottles in the refrigerator, this makes it easy for me to grab and go.

Monday, October 21, 2013

Strawberry Honey Comb Cake (Banh Bo Nuong Dau)


The Vietnamese honey comb cake (banh bo nuong) is one of the many favorite item in our house for dessert/snack.  My family has been requesting for me to make a strawberry flavored honey comb cake, so I decided to experiment, which is normally only made as a pandan flavored cake.  Amazingly it turned out quite tasty and was a big hit with everyone.


Ingredients


1 1/4 cups of tapioca flour
4 oz (1/2 cup) of coconut milk
1 bag of Alsa Brand single acting baking powder
6 large eggs
1 cup of sugar
1 teaspoon of strawberry extract
30 drops of red food coloring


Baking Instructions

Turn on the oven and preheat to 350F.

Combine the flour and baking powder together and set aside.

In a large bowl, lightly mix the eggs and the sugar with a fork.  Remember to mix just enough to homogenize the whites and yolks.  DO NOT over mix, it may cause the cake to be flat.  

Once the eggs and sugar are mixed, stir in the tapioca flour mixture, coconut milk, food coloring and strawberry extract.  Mix well.


Brush oil on the baking pan and put it in the oven on the 2nd lowest rack to heat up. The baking pan should be in the oven for about 5 minutes.


Use a basket to strain the mixture into another bowl.  Then use a strainer to strain the mixture into yet another bowl.   Straining the mixture a second time optional, just once should be sufficient, but I like to do it twice.


Pour the mixture into the hot baking pan from the oven.  You should hear the sizzling sound.  

Bake it for about 10 minutes at 350F. Then reduce the heat to 300F and bake for additional 30 minutes.  If your oven is not a convection oven, bake it for a little bit longer. To test if the cake is done, insert a toothpick and it should come out clean.

Once the cake is done, turn the oven off but leave the cake in the oven for an additional 10 minutes, before removing from the oven.
Once you remove the cake from the oven, let it cool down before cutting and removing from baking pan.


TIP:  This is a great dessert to bring to a house party/dinner with friends and family.  You can also bake in aluminum foil pan or put on a nice plate as a gift to the party host.


Sunday, October 20, 2013

Pico de gallo


Fresh pico de gallo is something I make at least once a week.  It is light and refreshing and great to pair up with fish, chicken or steak.  We like to put it on grilled or baked fish for a light meal, or also use it inside tacos.

 
Ingredients


6 roma tomatoes
1/2 of red onion
2 big limes
2 medium jalapenos
1 small bunch of cilantro
2 teaspoons of salt
1 teaspoon of black pepper

 
Instructions

Clean and remove seeds from jalapenos.  Then cut into small pieces.


Chop tomatoes, half of onions and cilantro into small pieces.  Put all chopped veggies into bowl.

 
Squeeze juice from 2 medium limes into bowl.  Combine salt and pepper and mix well.  Refrigerate for 2 hours before serving.


 TIP:  If you like extra onions, add the other half and it will still taste great.  This will last in the fridge for about 1 week, but we always use it all up before the week is over.